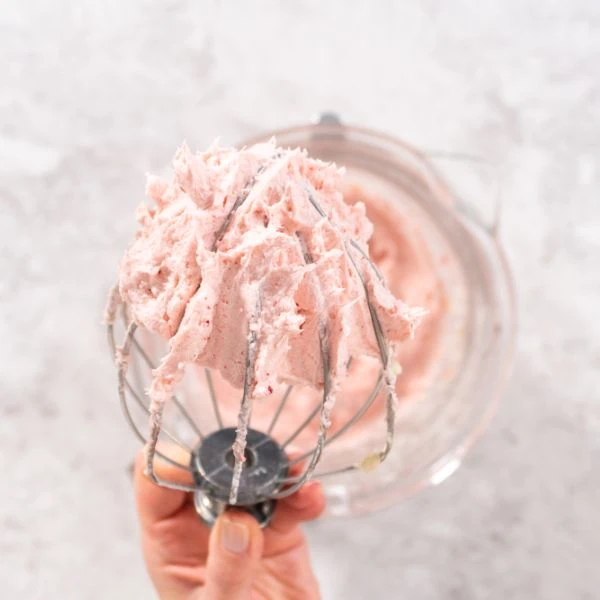
When buttercream is done right, it’s absolutely amazing. Smooth, light, and fluffy is what you want, and today we’re going to talk about how to fix grainy buttercream to increase the chances that perfect buttercream frosting is what you’re going to GET.
To that effect, we’re going to talk about the most common causes of grainy buttercream, and how to fix them, and we’ll also throw in some protips and a little ‘preventative maintenance’ that can help you to avoid grainy buttercream altogether.
Read on and we’ll tell you how it’s done!
Bottom Line Upfront
First off, you want to make sure that you are mixing at a consistently low speed with your paddle. It’s also good to whip the butter first before adding your icing sugar and you also want to make sure that you sifted the sugar in advance.
After that, make sure you are using real butter – not low-fat or margarine – and you might consider adding milk or even a little melted chocolate to get your buttercream to the light fluffiness and off-white color that you’re looking for.
We’ll elaborate a little more on this as we go and we’ve got a few useful tips scattered around in there, so if you don’t have time to read this all right now then be sure to bookmark it for later – you’ll be happy that you did!
Grainy Buttercream – How did this happen?
When your buttercream comes out less than perfect, there are a number of reasons why this might be the case. In this section, we’ll cover a quick checklist that you can read through and file away so that we can isolate what may have happened with this particular batch.
Let’s take at the most common causes of buttercream inconsistency.
Butter vs. Margarine

Margarine should be avoided when making buttercream. While we understand that many people prefer margarine to butter, with baking it can be a bit of a gamble. That’s because margarine has much more water and a lot less fat than butter – so it’s not going to melt or blend the same.
So, you’ll want to go with butter for buttercream ALWAYS and don’t go for low-fat butter, either. As with margarine, anytime the fat ratio is different your results are going to vary if it’s a recipe that calls for standard, fatty butter.
The final thing to consider with buttercream gone grainy is your butter’s temperature. It should be at room temperature. Cold butter will take longer to heat up with baking and the uneven melting will play havoc with that perfect, creamy consistency that you’re looking for.
If you are looking to make a cream cheese frosting, be sure to add the right proportions to the mix since cream cheese will also add a certain amount of fat and cream as well.
Did you sift that icing sugar?
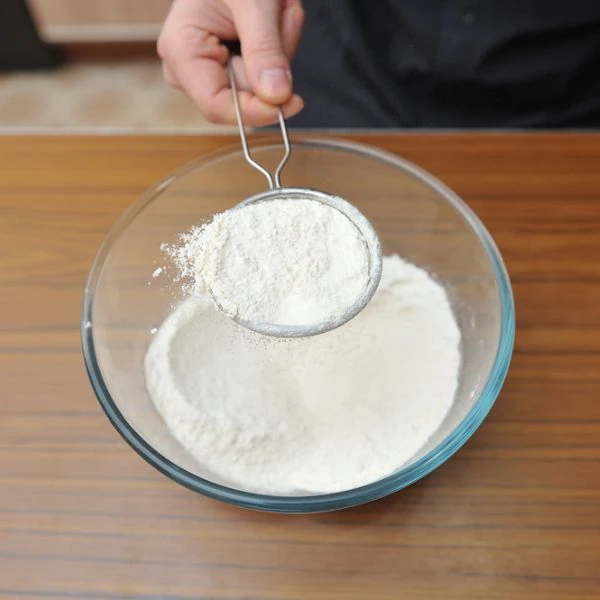
When you think of icing sugar, clumping is probably the farthest thing from your mind. This stuff is incredibly fine, after all, so it really doesn’t seem like clumping should be a worry.
Unfortunately, this is NOT the case.
Unsifted icing sugar, as fine as it is, will have tiny clumps in it and they’re going to end up in your buttercream and your inner perfectionist will swear that those scattered lumps have turned it into a sort of ‘frosting sandpaper’ (let’s face it, no one is more critical of us than ourselves!).
So, save yourself a little trouble and a whole lot of cursing by simply sifting that icing sugar well in advance. It will blend better and your chances of surprise clumping cramping your style will be greatly minimized.
Make sure it is icing sugar, confectioner’s sugar, or powdered sugar. Do not but castor sugar, white sugar or brown sugar hoping to make icing or it will be extremely grainy!
A ‘quick mix’ won’t cut it
While we’ve got mixers these days that feel powerful enough to make concrete chunks into frosting, rushing through the mixing process is never a good idea. On average, you’ll spend about 5 minutes mixing your buttercream and perhaps a few minutes more if your ingredients or the bowl are not at room temperature when you start.
If you tend to chill ingredients first, then simply get in the habit of taking them out early enough for them to warm up to room temperature before you start. After that, mix thoroughly at a consistent speed setting for 5 – 6 minutes – not 3 or 4 or less.
It’s a small time investment but if you cut corners, you’ll taste the difference, and you’re not going to have a good day!
How can I fix the grainy buttercream?

Now that we’ve established the most common causes of grainy buttercream, what can you do to fix it?
Well, thankfully, you’ve got quite a few options that you can read through and add to your mental checklist so that they’ll become a habit over time as your ‘buttercream game’ starts reaching new and ever more delicious heights. Let’s take a look!
Don’t be impatient – good things take time
To help avoid under and overmixing, think of the standard mixing time as 5 to 6 minutes and no less. Use this as your foundation so that you always mix for AT LEAST 5 to 6 minutes and if it’s still grainy, pop that kitchen timer to 3 minutes and steadily mix it a little more.
An extra focused 3 minutes is enough time to make sure that the batch was mixed as thoroughly as possible, so if it’s still grainy then we can rule out the mixing part of the equation and try another tack to achieve better buttercream – after you try leaving it alone overnight.
This is the last part and it takes the most patience, but leaving your buttercream to sit overnight can help some of those stubborn sugar clumps to dissolve and if that’s the only problem, then you’ll be very happy that you had the patience to wait it out.
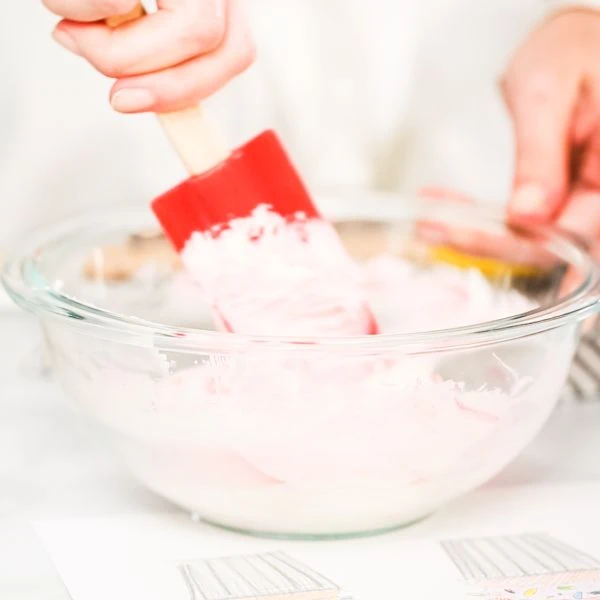
A touch of milk (or butter) can work wonders
You need to be very careful with this technique but if you are very stingy with the amount of liquid that you add then sometimes a little milk or butter can get you the creamy consistency you crave.
Start with a single tablespoon of milk and mix thoroughly. You’d be surprised how often that single tablespoon is all it takes, although there are times when you might even add one or two more.
We recommend that if the first tablespoon doesn’t cut it, but you’re seeing progress, you add just half a tablespoon of liquid next, mix, and then check it again.
You’ve got recipes memorized and by being very careful and stingy with that liquid, you can reduce the risks of runny buttercream and also mentally amend the recipe so that next time, you add EXACTLY enough liquid for buttercream perfection.
Hide your sins with chocolate
Let’s face it – in life, there aren’t a whole lot of things that chocolate can’t fix. With buttercream, you can actually add melted chocolate one tablespoon at a time and since it acts as an emulsifier, you’ll have a great chance of hitting that ‘ideal consistency’ mark that you need for a good buttercream.
As an added bonus, you can dip some fruits in any extra melted chocolate to celebrate fixing your buttercream, but let’s not get ahead of ourselves – try this trick if you love chocolate and see if it fixes the issue.
Make sure you’re only mixing it with the paddle
If you have someone in your life who is handy at fixing and building things, then you’ve probably heard the old adage ‘the right tool for the right job’ and it’s a good one. With your buttercream, that ‘right tool’ is your paddle – you can even use it to whisk the eggs and throughout the rest of the mixing process.
So, no matter how many cool attachments you have, with buttercream we want to keep it simple – the paddle attachment is your key to the door of silky, buttery goodness!
‘Preventative maintenance’ habits
Getting into good habits can save you a world of trouble later, so we’ve got 5 quick ‘preventative maintenance’ tips that can help if you are new to making buttercream icing. As the old Ben Franklin saying goes ‘an ounce of prevention is worth a pound of the cure’, so let’s look at some ‘preventative maintenance’ habits that can really help you down the line:
- Avoid low-fat butter or margarine – We touched this in brief, but let’s expand on this a little. When a recipe calls for butter, it’s almost always the standard, fatty kind, as that’s what tastes the best if we don’t factor in health concerns. So, have some handy specifically for baking.
- Butter must be at room-temperature – Quick tip, you DON’T need to store unsalted butter in the fridge, but with other types of butter, it will be less likely to go rancid in your fridge. For those types of butter, get in the habit of taking them out of the fridge in the morning before baking. They’ll be room temperature and fine for up to a couple of days, so you’ll have plenty of time to use them and put them back into the fridge.
- Consider your sugar ratio – A really good exercise to learn about buttercream from the ‘inside out’ is to simply try making it with a strict ratio of 2 parts well-sifted icing sugar to 1 part butter. If carefully measured, then you can keep at it and get a buttercream that is both smoothed and not over-sugared. It takes a little time, but the experience turns a recipe into something intuitive, so carefully measure and take the ‘old-fashioned’ approach – it works.
- Slow and steady wins the race (don’t rev the mixer!) – Your mixer is not a motorcycle, so resist the urge to ‘rev’ it. Use a low setting from start to finish and remember ‘buttercream is naughty, so it gets the paddle’. With that low speed and paddle attachment, you’ll remove all the air pockets within 5 – 6 minutes of mixing and then you can let it set with confidence.
- Whip your butter – A nice little protip is to get in the habit of whipping your butter for 1-2 minutes before you start adding sugar. This heats it up to the right temperature and the added air will make the butter paler, right before you get that perfect, smooth consistency.
FAQs
That’s just about all of the time that we have for today, but before we check out with the front desk, we wanted to leave a few frequently asked questions and their answers with you to help on your quest for a better buttercream. Below are some of the questions that we get the most!
How do I whiten up grainy buttercream?
Whipping the butter before you add your sugar will lighten up the natural yellow color of butter a little bit, but you kind of have to cheat if you really want to lighten the finished color. While you are fixing your grainy buttercream, you can add a small amount of purple gel coloration and in combination with the natural yellow, you’ll get a fantastic off-white color to your finished buttercream that you’re really going to LOVE. Try it sometime and we just about guarantee you’ll be adding purple gel to your pantry – you can find purple here with this Wilton Violet Icing color or have a little fun and spring for a multi-color set like this Americolor option for all your icing and creative colorful cooking experiments.
Can heavy cream make my grainy buttercream light and fluffy?
Yes, actually, and many people swear that heavy cream is the key to perfect buttercream. Try adding a little sometime when you are experimenting and working with a thick, yellow buttercream, and watch what happens.
Heavy cream is very good at dissolving some of those pesky sugar clumps that are making your buttercream grainy and curse-worthy. Not only that, but you’ll get more of an off-white than a yellow color in the smooth, finished cream, so it’s kind of a win-win all around!
How do I fix grainy buttercream with less strain on my arms?
If you have fibromyalgia, arthritis, or simply work a job that puts a lot of strain on your arms and hands, then a stand mixer is an absolute MUST. It will reduce the strain on your arms and the ease of use really helps you to give all of your focus to the mixing process, so that you can deal with clumps and air bubbles instead of thinking ‘is this enough?’ the whole time.
If you don’t already have a stand mixer, then you should really consider getting one – it’s the BEST way to mix buttercream and it will make your life a whole lot easier.
Can you soften butter in the microwave for buttercream frosting?
While a lot of you out there probably just yelled at us for even bringing this up, stay with us for a second – you CAN soften butter in a microwave, just not the way that you think.
Get a microwave safe bowl that can hold a little over 2 cups of liquid and we’ll show you what we mean.
Put 2 cups of water in your microwave safe bowl and set the timer to 2 minutes to microwave the water – NOT your butter – on the ‘standard’ power setting.
Put that butter on a small plate outside of the microwave while your water cooks. When the timer says it’s done, carefully remove the water and put your plate of butter inside the microwave but LEAVE IT OFF.
Let the plate sit with your butter on it inside of the microwave for 10 minutes and the ambient heat and humidity from boiling your water will do the rest. So, ‘technically’ we’re warming it in the microwave, but as we promised, it wasn’t the way that most of you thought we would! While you COULD just microwave the butter itself, you don’t want to EVER do that for buttercream.
Microwaves work by generating friction in water molecules, which is bad for butter and can lead to mixed results (to say the least) in your buttercream. By simply heating the water and ‘riding’ that ambient heat we can safely warm up the butter without risking ‘weird science’ to do it, so this is the only ‘microwave workaround’ that is ‘buttercream approved’.
In Conclusion
Today we’ve talked about how to fix grainy buttercream and as you can see, it’s all about dotting your I’s and crossing your t’s. Starting off, you always want to mix at low and use the paddle from start to finish – it’s perfect for mixing and getting those bubbles out before they can become a problem.
Make sure that you are using real, room-temperature butter and for best results, whip it a couple of minutes first before you start adding your sugar. Heavy cream can also make a huge difference in the finished consistency and color, so don’t forget to work with it when making your buttercream in your quest for butter creamy perfection.
Finally, you can add milk if you’re careful with the amounts and melted chocolate can also work wonders, as it acts as an emulsifier. Above all else, just be patient with the process if you’re new – it’s really rare to get a perfect buttercream the first time, but with experience and experimentation you’ll get a feel for it and once that happens, your buttercream will be the stuff of dreams made real!


David learned to cook at an early age after his mother told him that he couldn't live on pizza forever, Dave uses his modest kitchen skills to recreate sorely-missed recipes from home and to occasionally make new favorite ones from places he is visiting.