Canning is a great way to store nutrient rich, perfectly cooked food on your own and a staple of a homesteading mindset. So, with that in mind, what’s the best pressure canner for beginners who would like to start canning their favorite recipes?
In today’s article, we’ve collected 10 of the best pressure canners to show you, and we’re including a wide range of types in order to try and accommodate your personal preferences as best we can. We’ll tell you a little about each, as well as the pros and cons, and also answer a few frequently asked questions along the way before we share our favorites with you and the reasoning behind why we picked them.
Let’s talk about the best pressure canner for beginners and what you need to know to pick the right pressure canner for YOU!
Our Top 3 picks at a glance
We know that some of you are in a hurry, so for those folks we’ve got a sneak peek at our 3 favorites from the list. We’ll talk more about each at the close of this article, so be sure to bookmark the page so that you can read about these and the others that made our list at your leisure. That said, here are the highlights on our 3 favorites:
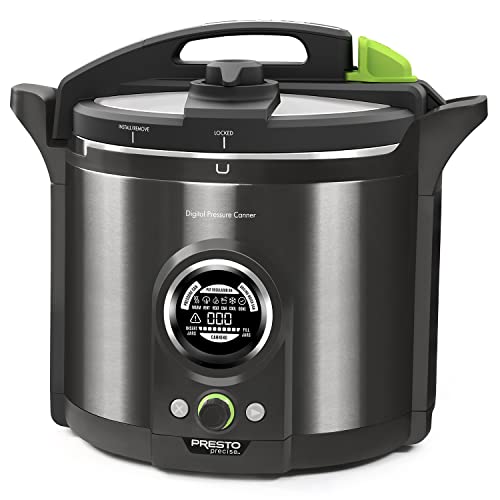
- Best beginner model overall – Presto 12 qt Electric Pressure Canner -When it comes to ease of use, the Presto is hard to beat. With digital controls and a 12 quart capacity, you can get a lot done with this model and it’s much less stressful than watching dials.
- Best Bargain – T-fal Pressure Cooker 22 Quart Pressure Canner with Pressure Control – It’s a little on the spartan side, but this T-fal cooker is well built and has a very generous capacity. At its current price, it’s quite the bargain.
- Best made model – All American 1930 21.5qt Pressure Cooker/Canner – This is the kind of canner that’s made to last a lifetime. It’s a bit on the pricey side, but you can tell just by looking at it that it’s made to last!
Why should I cook my own food at home?
Home canning puts you in control over what goes into your food and, by extension, your body. Today’s supermarket shelves are packed with a multitude of foods and these foods are, in turn, packed with a long list of ingredients. Artificial colorings, flavoring, and preservatives are nothing new, but these days every processed food seems to be loaded with salt and the ubiquitous high-fructose corn syrup.
Many people are becoming alarmed by this trend, as well as the monocultural farming methods that are damaging to the environment. We all like to eat a fresh, varied diet, but food spoilage is a serious problem.
What’s a busy, health-conscious person to do? A good option is home food preservation, especially for low-acid foods like green beans, which require a higher temperature to ensure food safety.
Then go to a farmer’s market, buy whatever’s in season, and can it.
How do I can my own food?
You might initially balk at the idea of canning, but it’s super easy to do at home! The canning process is essentially just putting some food in a jar, closing the lid, then cooking it until the microscopic bugs inside are dead.
To ensure that dangerous microorganisms don’t make a surprise reappearance after being kept in the cupboard for a while, it’s necessary to raise the internal temperature of the center of the food to 250° F (121° C) for three minutes. This might not sound like an issue, but water has a boiling point of only 212° F (100° C).
In order to raise the temperature to safe levels, you have to pump up the pressure. This is where pressure canning works its magic, especially at high altitudes where water boils at lower temperatures.
It’s still a pretty simple process and, as long as you keep your environment clean, it’s hard to mess up. I like to think of canning as one of those cooking tricks where the final product makes it look like you did a lot, even if you didn’t. Of course, you don’t have to admit to anyone how easy it was—just nod and modestly say that you’re just getting started!
The Best Pressure Canners for Beginners
In the sections below, we’ve compiled a list of 10 of the best pressure canners for beginners. For each one, we’ll give you useful information such as settings, dimensions, weight, and other important aspects and we’ll also briefly talk about the pros and cons of each. If you’re ready, then let’s get this show started!
From stovetop pressure canners to modern pressure canners like the instant pot, there are different pressure canners for every beginner canner.
If you’re looking to start small, this Universal 6.3 quart pressure cooker for canning might be just what you need. Measuring in at 9.5″D x 16.1″W x 9.6″H and weighing about 4.24 pounds, the sturdy aluminum pot heats evenly and uses a collection of safety valves to help ensure that your sealed and pressurized pot will not exceed 11.60PSI/80 KPa.
As far as servings, you can create individual canning servings in this pot and if you’re new to canning, then it’s a great way to learn the ropes without worrying about spoiling a larger, more expensive batch.
Universal’s brand is sourced from Colombia, and we’ve seen a lot of quality cookware coming from there, so we weren’t surprised to see that Universal is backing this pot up with a solid 25 year warranty and while it won’t work on induction stoves due to the aluminum build, you still use it on gas, ceramic, or an electric stove.
Pros:
Tiny but mighty, this is a well-made canning pot that won’t break the bank and is enough to get you started so that you can see if you’ll be sticking with canning.
Cons:
Due to its size, you can only make 7 portions, so you might outgrow this pot quickly – or you could get creative with your ‘extra canning pot’ and just use this one for your more experimental canning. Also, its tight seal makes it a safe canning option for low-acid vegetables.
Next up we have this Barton 8qt Anodized aluminum pressure canner with a locking lid and a working pressure of 80 kpa. Designed to seal in nutrients and flavors with your favorite meats and veggies, it’s got a cover look indicator so that you can know when the contents inside are pressurized and silicone seals help to ensure that the pressure is consistent and controlled.
Measuring in at 11″D x 17.5″W x 8.75″H and weighing about 6.4 pounds, this unit also features a locking lid that may be unlocked at the press of a button, and it may be used with gas, electric, and ceramic stovetops – but NOT induction. That being said, it is compatible with most heat sources, including gas ranges and provides consistent pressure for safe canning.
Pros:
This is a well-built pressure canner that you should get a lot of mileage out of. It seals and heats nicely and as long as you keep it clean, it should stand up to years of regular use.
Cons:
While 8 quarts is a great ‘beginner’ size, some folks may prefer to start with a larger capacity so that the cooker can keep up with more aggressive canning.
This pretty little pressure cooker and canner comes from Carey. The Carey DPC-9SS Smart Electric Pressure cooker and canner gives you 9.5 quart capacity and digital control for ease of use and precise temperatures. Measuring 15″D x 15″W x 14″H, this pressure canner comes with both standard and high altitude limiting valves rated for 10 and 15 psi, and includes a canning and steaming rack. The lid also has a removable ‘condensation catcher’ for easy cleanup and the unit itself is dishwasher safe.
As far as use, you can program it yourself or take advantage of easy presets for jams, pickles, salsas, and other popular canning options, so if you’re looking for a friendly electronic option then this Carey might just be your new favorite pressure canner!
Pros:
Easy to use, a 9.5 quart capacity is definitely workable without going overboard, and we like the presets and easy cleaning – canning can get a bit messy, after all, so easy cleanup is always appreciated.
Cons:
To give you an idea of the capacity, 9.5 quarts will let you make about 16 4 oz jelly jar contents at a time and while this will be plenty for some, other folks might want something more robust.
A name that many of us know and love, Presto enters our list with this fantastic 12 quart digital pressure canner and it’s really a sight to see. This 1485 watt cooker measures 14″D x 17″W x 16″H and weighs about 24 pounds, and it also boasts to be the FIRST digital pressure cooker to meet USDA canning guidelines!
Designed for easy use, the intuitive digital display keeps you apprised of progress during your canning sessions and the included canning rack means it’s ready to go.
With a 12 quart capacity, you can expect to can the equivalent of approximately 4 quarts at a time so if you have some light canning needs to satisfy, then this digital pressure canner from Presto might be your new favorite kitchen canner.
As an added bonus, it’s ideal for beginners and comes with an easy-to-follow instruction manual.
Pros:
Presto makes quality appliances and this Electric Pressure canner is definitely no exception. We like the capacity and the easy control system – it’s not complicated at all, but it does the job nicely and that’s exactly what you need.
Cons:
Unless you need more capacity, you’re going to love this Presto.
Here we have the WantJoin Pressure Cooker and it’s a lovely 12.6 quart stainless-steel canner that’s built to last. Induction ready, this durable pressure canner features safety valves that can detect when pressure levels have become dangerous and can automatically relieve enough pressure to ensure that your canning is efficient and safe.
Measuring in at 11.8″D x 11.8″W x 7.3″H and weighing 10.9 pounds, this unit also features a heat-resistant bakelite handle to keep you from burning your hands during handling. If you’re looking for a pressure canner that doesn’t waste time with unneeded bells and whistles, then this WantJoin is an excellent option to consider.
Pros:
This is a robust pressure cooker and the stainless steel means it’s also ultra-durable and induction ready. It also has a big enough capacity that you can get some work done and that certainly doesn’t hurt! This makes it suitable for both small and big batches of high-acid foods.
Cons:
While bakelite is heat resistant, we would have preferred a more robust and heavily riveted handle.
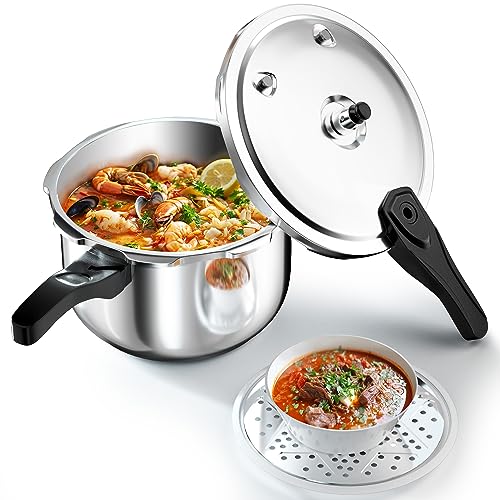
Our next pressure cooker for canning is this Zavor Canning-Ready Stove Top Pressure cooker and it’s a good-looking little kitchen tool. Made of stainless steel, this pot measures 11.6″D x 12″W x 15.3″H and weighs in at a respectable 10.7 pounds – so it’s nice and hefty.
Features for the Zavor include an EZ lock lid, pressure settings that range from a low pressure 10 psi to a high pressure 15, and enough capacity to fill 4 1 quart mason jars! You’ll need to supply the canning rack and tools – they do not come with this model – but the Zavor can provide the pressure and large capacity that you’ll need.
Pros:
12.7 quarts is a nice mid-level capacity so that you can get a lot of good use out of your Zavor and while it’s not fancy, it’s solidly built and very good at its job.
Cons:
It would have been nice of them to throw in a canning rack but beyond this, we had no complaints about this unit.
7. Mirro 92116 16 quart Polished Aluminum 5 / 10 / 15-PSI Pressure Cooker / Canner Cookware
Our next canning option is this Mirro 92116 Polished Aluminum Pressure Cooker and Canner. Made of heavy gauge aluminum, this Mirror boasts a capacity equivalent to 5 quart jars or 16 pint jars and comes with a cooking rack and some recipes to get you started.
This pressure cooker measures 15.5″D x 18.5″W x 15.5″H and weighs approximately 9.4 pounds and includes features like side gasket pressure release, a reusable overpressure plug, and a locking lid mechanism to ensure perfect pressure.
Pressure options at 5, 10, and 15 PSI, and this unit also comes with a 1 year parts warranty and a 10 year limited warranty on the cooker itself – always a nice plus in our book!
Pros:
Well-built, stainless steel pressure canners tend to be robust and this Mirror is no exception to that rule. You also have a respectable capacity if you’d like to do a nice bit of canning and the warranty is also a nice touch.
Cons:
This is a very minimalist design that will appeal to some but not everyone – if you’re looking for more bells and whistles, this model won’t be a good fit.
Click here to view this item on Amazon
This tough-looking ‘tank’ of a pressure cooker and canner is the All American 1930 and this is one canning option that means BUSINESS. Measuring in at 16.38″D x 16.75″W x 18″H and weighing approximately 21.1 pounds, this canner gives you enough capacity to produce up to 7 quart jars or 19 pint jars – not too shabby at all.
These units come in different colors, too, with storm, saffron, mustard, barley, and silver being your options and they utilize a gasket-free system so that you’ll get more mileage out of the unit without having to pay for expensive gaskets if something goes wrong.
If you want a solid American canner that uses a precision machined metal-to-metal sealing system and can really produce for you, then look no further – The All American 1930 has got you covered.
Pros:
These units are real beauties. You’ve got all that fantastic capacity and they are precision machined and designed to LAST.
Cons:
A large capacity cooker like this is an investment and if you are not 100% positive that canning is going to be your new favorite thing, a smaller model is definitely recommended.
Our next high-capacity pressure canner is this TFal 22 quart capacity model and while it doesn’t have a lot of fancy extras, it gives you everything you need to do some serious canning at a price that won’t break the bank. Its large-capacity canner is best for big batches, making it the best option for processing half-pint jars or larger sizes.
Measuring in at 15.39″D x 19.33″W x 16.26″H and weighing roughly 14 pounds, this unit features two secure locking handles, along with your pressure gauge, a handy steam release valve, and PSI settings of 5, 10, and 15 to fit your needs. For added safety, a 5 point security lock means that there’s absolutely NO WAY you’ll be opening this on accident and that’s definitely a nice feature to have. If you like your kitchen appliances to be sturdy, spartan, and powerful, then this T-fal definitely fits the bill.
Pros:
It’s very competitively priced and with the 22 quart capacity, you can make 7 1 quart jars at a time – it’s to everything you need to do it and a mirror finish that looks sharp in your kitchen.
Cons:
As it’s aluminum, this unit will NOT work with induction stoves, so if you have one then you’ll need to pick a different cooker.
Presto makes our list again with another pressure canner, although this one is definitely not digital. The Presto 01781 23-quart pressure canner and cooker gives you a large capacity to work with and a robust heavy-gauge aluminum construction.
Measuring 15.5″D x 17.5″W x 13.5″H and weighing a lightweight 12 pounds, features for this cooker include an automatic air vent to ensure that you cannot open it until pressure is reduced, a deluxe pressure gauge, a canning and cooking rack, and a nice little recipe book to give you some projects to play with. With a 23 quart capacity, you can get a lot of use out of this model, and it will work on electric, gas, and ceramic stovetops but NOT induction ones.
Pros:
Presto has a good reputation for quality products and this 23 quart pressure cooker gives you the basics plus the kind of capacity you can really get work done with. There’s even an extended 12 year limited warranty, so the odds are that you’ll be getting many happy years of use out of your Presto.
Cons:
If you have an induction stove or if you simply want more bells and whistles, then this spartan model may not be a good fit.
FAQs
We’ve come to that point in the article when we’re about to render our ‘verdict’ on our 3 favorites, but before we officially do so and wrap things up, here are a few frequently asked questions on pressure canners to help if you’re still deciding which ones were your favorites. Let’s take a peek and then we’ll wrap things up good and proper!
Can I use these canners on induction cooktops?
While most of the models listed are compatible with various heat sources, those made from certain materials like aluminum are not suitable for induction cooktops.
Is a pressure canner worth it?
While you could certainly cobble together a ‘homegrown’ canning solution, a dedicated pressure canner has a lot of perks that definitely make it worthwhile. For one thing, you’ll use less fuel and less water, and for another you can eliminate the guesswork – sure, if you’ve been canning for years, a makeshift solution might be perfectly workable, but a dedicated pressure canner is designed to hit all the marks for a controlled, even cook at the perfect, required pressurization.
Simply put, if you’re going to be canning, this is a tool you’ll be using every week and that makes it well worth the investment.
What pressure do commercial canners use?
A commercial canner usually incorporates a pressurized heat of 250 degrees with about 15 pounds of pressure being used. Your home models, by contrast, typically offer settings of 5, 10, and 15 psi, so that you can do your canning properly and safely with a comparable amount of function on a smaller scale.
What PSI is needed for pressure canning?
For low acid foods, a minimum temperature of 240 degrees Fahrenheit and a pressure of 10.5 PSI is going to be what you need. Keep in mind, however, that the different PSI settings are optimized for different types of foods, so be sure to check your recipe and follow it to a ‘T’. There’s a little learning curve with canning that we all go through, so as long as you stick to the recipes then eventually, you’ll be able to look at the type of food and you’ll know right away what it needs for a safe, calculated cook.
It just takes time, patience, and regular use of your pressure canner.
The Verdict
We’re at the point in the article where we need to commit, so we’ll share with you our 3 favorites from the list and tell you what we liked about each. Let’s take a look and then we’ll wrap things up!
Best beginner model overall – Presto 12 qt Electric Pressure Canner
It doesn’t get much easier than this Presto digital pressure cooker. Instead of watching dials, you’ve got a digital display to apprise you of progress, and it’s got everything that you need for canning. Probably the hardest part of getting started is watching those pressure gauges and with this Presto, you won’t need to. It’s sleek, smart, and ready to go.
Best Bargain – T-fal Pressure Cooker 22 Quart Pressure Canner with Pressure Control
Priced to go, this is a well-made pressure cooker that gives you enough capacity to really get a lot done. While it’s not the fanciest model, it’s built to last and gives you everything that you need to get started. If you are just getting started, it also lets you get a wide capacity canning cooker without breaking the bank and that’s also a definite plus for this model!
Best made model – All American 1930 21.5qt Pressure Cooker/Canner
This has to be the best overall construction that we’ve seen for a canner. It’s also a good choice for those looking for replacement parts, as All American canners are known for their availability of parts.
The All American 1930 has a great capacity, it’s stylish, and it’s the kind of canner that you can pass down to someone else someday.
While it’s definitely on the pricey side, it’s a very high quality canner, so if you intend to do a lot of canning then this is a good investment for your homesteading supplies, but if you are more of a ‘casual canner’ then a smaller, less=expensive model will definitely be a better fit.
We’d like to thank you folks for visiting this page and as always, be sure to leave comments if you feel so inclined to share some of your own canning tips and favorite pressure canners. Until next time, we wish you all the very best.








David learned to cook at an early age after his mother told him that he couldn't live on pizza forever, Dave uses his modest kitchen skills to recreate sorely-missed recipes from home and to occasionally make new favorite ones from places he is visiting.