Kitchen knives are easily one of the most commonly used tools on the planet. They are simple, yet used for a variety of culinary tasks on a daily basis. But the very cutting edge that we rely on — and the source of the knife’s power–is nearly invisible to the unaided eye, a reason why we seem to take these trusty instruments for granted.
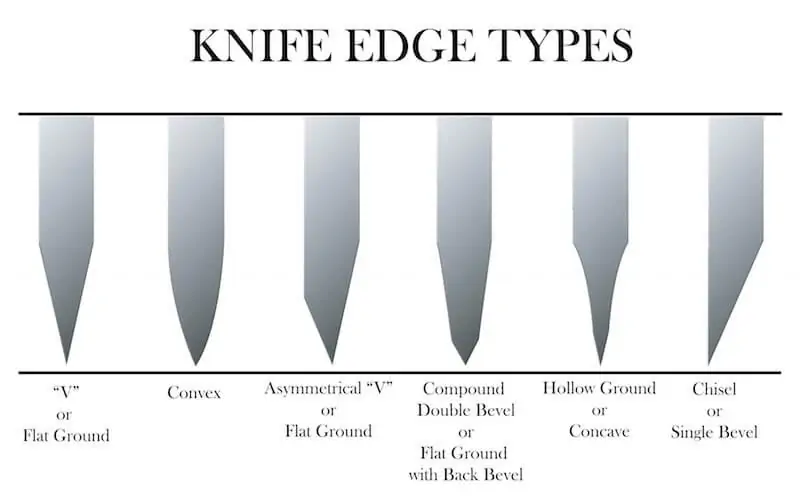
The majority of kitchen knives are flat ground, meaning the blade begins to taper from the spine to the edge. However, knife edges come in a variety of styles and differences in the way the blade is ground to make it sharp.
See my guide to the best kitchen knives.
Fortunately, learning just a little bit about your knives and their various edges will teach you how to best maintain them and keep them sharp.
Knife Edge Styles
Every knife blade is ground uniquely to form a sharpened edge. Each side of the blade that has honed an edge is referred to as a bevel. If you look closely at the blade of your kitchen knives, you should notice a part at the very edge that angles more steeply–this is the bevel.
If you look closely at the blade of your kitchen knives, you should notice a part at the very edge that angles more steeply–this is the primary bevel. Most of the time people refer to the Edge Angle—see the image below. Typically, this is about 15º to 25º for kitchen knives. See the best 15º knife sharpener.
A hunting or pocket knife maybe closer to 25º to 30º since the wider less sharp angle provides more durability to cut things.

V-edge
The V-edge is the most common style for kitchen knives. Like the letter V, these blades slant directly from the spine to the edge at a symmetric angle.
V-edges are the preferred design for most kitchen knife makers as they are easy to sharpen and hold their edge longer, though durability is sacrificed in favor of a fine edge.
Double bevel or Compound Edge
A double beveled edge, also known as a compound edge, is essentially a double-layered V-edge. Picture a large V with a smaller V on top of it. This is my favorite overall. It’s sharp and durable.
The secondary bevel, also known as a relief angle, serves to make the metal behind the edge thinner. In principle, a thinner-edged blade has a greater cutting ability given its lack of friction—but it is also more likely to sustain damage.
The idea behind a double bevel is to make the edge stronger and more resistant to rolling and cracking with the support of the secondary bevel.
A couple of Chef’s Choice knife sharpeners work this way—The M1520 and the M120 for example.
Chisel edge
Chisel edges are most commonly found on Japanese sushi knives like Santokus and Nakiris.
These blades are only ground on one side to form a single primary bevel, while the other side is left straight and flat. For this reason, chisel edge knives can be found in both left-handed and right-handed varieties.
The edge is usually sharpened between 20º and 25º, which comprises the total angle of the edge (the flat side has an angle of 0). Such an acute angle makes chisel edges exceptionally thin and sharp compared to most American and European knives.
This design makes chisel edge knives the preferred style for cutting delicate raw fish in sushi restaurants.
Convex edge
Convex edge blades feature two outward arcs that slope in and intersect at the edge. The resulting look of the edge resembles the slope of an airplane wing.
The curved design puts more steel behind the edge, making it stronger and sharper than V-edged blades.
Since the creation of a convex edge is a bit more sophisticated than others, they can be more difficult to sharpen effectively with home sharpeners. Because of this, convex edges often lose their shape and are eventually shaved down to V-edges.
Hollow edge
Hollow edge blades, also known as concave edges, curve inward–the opposite direction of convex edges.
These blades can get very sharp, but the limited steel supporting the edge makes them more susceptible to damage. Hollow edges are usually reserved for hunting and survival knives.
Some bargain-brand butcher knives may employ a hollow edge, but most quality kitchen sets will feature a stronger V-edge.
Serrated edge
Like chisel edges, serrated-edged blades are ground on only one side. The distinguishing features of serrated edges are the mini-arches, or teeth, that serve to protect the actual cutting surface and keep the edge sharp.
Serrated edges are typically reserved for bread knives, tomato knives, and steak knives. The wavy edge of the blade puts greater pressure on the product being sliced, but the flat grind makes for a sharper and more precise cut. The complexity of the edge makes for a near impossible sharpening process. For this reason, serrated edged knives are best replaced after losing the cutting effectiveness.
Granton edge
Knives featuring a Granton edge are easily identified by the hollowed out grooves on the surface of the blade. Granton-edged blades typically utilize a V-edge design, but the grooves on the bevels of these knives give them a unique slicing quality.
These blades can achieve thin and even slices without tearing or shredding the product, as the grooves filter out the fats and juices. They also help to release the product from the blade after each slice to prevent sticking.
Conclusion
Chances are that most of the knives in your kitchen feature a conventional V-edge, meaning that most knife sharpeners will work just fine and your collection will be easy to maintain.
Most kitchens have a long, serrated edged knife for slicing bread, and many have a set of serrated steak knives. As previously mentioned, these knives can be difficult to sharpen, even by professionals, and are best replaced after seeing their share of use and abuse.
But for those knives that do not use a standard edge—most of which can be identified by the naked eye—special attention may be required to hone, sharpen, and maintain the blade’s edge.
Different edges require different sharpening devices and techniques, which are important things to know to make sure that your blades are always performing at their best.
Be sure that you are storing your knives properly, working an appropriate cutting surface, using each knife for its intended task, and honing your blades regularly.
A note about Knife Sharpeners
With a manual knife sharpening system, like the KME sharpener or the Spyderco Tri-Angle Sharpmaker Knife Sharpener, you can basically sharpen to any of the edges described on this page. Now, you may need to work a little harder for some of the edges.